Database
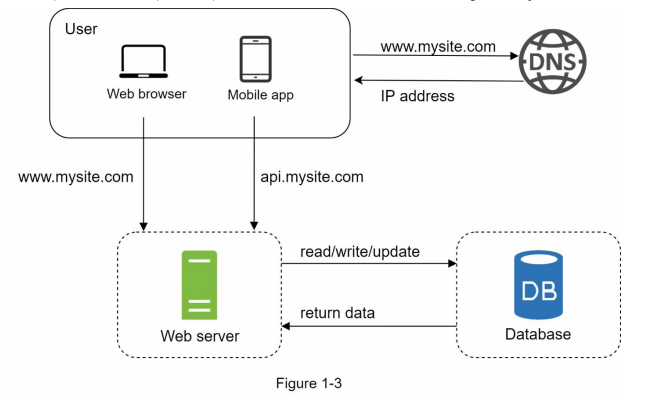
- With the growth of the user base, one server is not enough, and we need multiple servers: one for web/mobile traffic, the other for the database (Figure 1-3). Separating web/mobile traffic (web tier) and database (data tier) servers allows them to be scaled independently.
Which databases to use?
- You can choose between a traditional relational database and a non-relational database. Let us examine their differences.
- Relational databases are also called a relational database management system (RDBMS) or SQL database. The most popular ones are MySQL, Oracle database, PostgreSQL, etc.
- Relational databases represent and store data in tables and rows. You can perform join operations using SQL across different database tables.
- Non-Relational databases are also called NoSQL databases. Popular ones are CouchDB, Neo4j, Cassandra, HBase, Amazon DynamoDB, etc. [2]. These databases are grouped into four categories: key-value stores, graph stores, column stores, and document stores.
- Join operations are generally not supported in non-relational databases.
- For most developers, relational databases are the best option because they have been around for over 40 years and historically, they have worked well. However, if relational databases are not suitable for your specific use cases, it is critical to explore beyond relational databases.
- Non-relational databases might be the right choice if:
• Your application requires super-low latency.
• Your data are unstructured, or you do not have any relational data.
• You only need to serialize and deserialize data (JSON, XML, YAML, etc.).
• You need to store a massive amount of data.
Vertical scaling vs horizontal scaling
- Vertical scaling, referred to as “scale up”, means the process of adding more power (CPU, RAM, etc.) to your servers. Horizontal scaling, referred to as “scale-out”, allows you to scale by adding more servers into your pool of resources.
- When traffic is low, vertical scaling is a great option, and the simplicity of vertical scaling is its main advantage. Unfortunately, it comes with serious limitations.
• Vertical scaling has a hard limit. It is impossible to add unlimited CPU and memory to a single server.
• Vertical scaling does not have failover and redundancy. If one server goes down, the website/app goes down with it completely.
- Horizontal scaling is more desirable for large scale applications due to the limitations of vertical scaling.
- In the previous design, users are connected to the web server directly. Users will unable to access the website if the web server is offline. In another scenario, if many users access the web server simultaneously and it reaches the web server’s load limit, users generally experience slower response or fail to connect to the server.
- A load balancer is the best technique to address these problems.
Load balancer
- A load balancer evenly distributes incoming traffic among web servers that are defined in a load-balanced set. Figure 1-4 shows how a load balancer works.
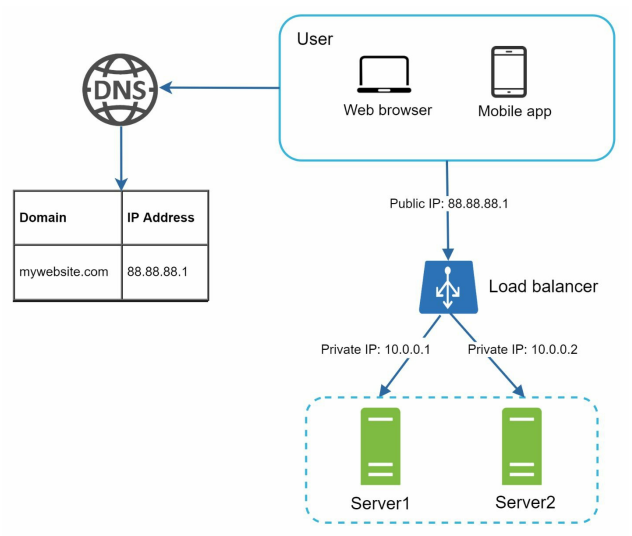
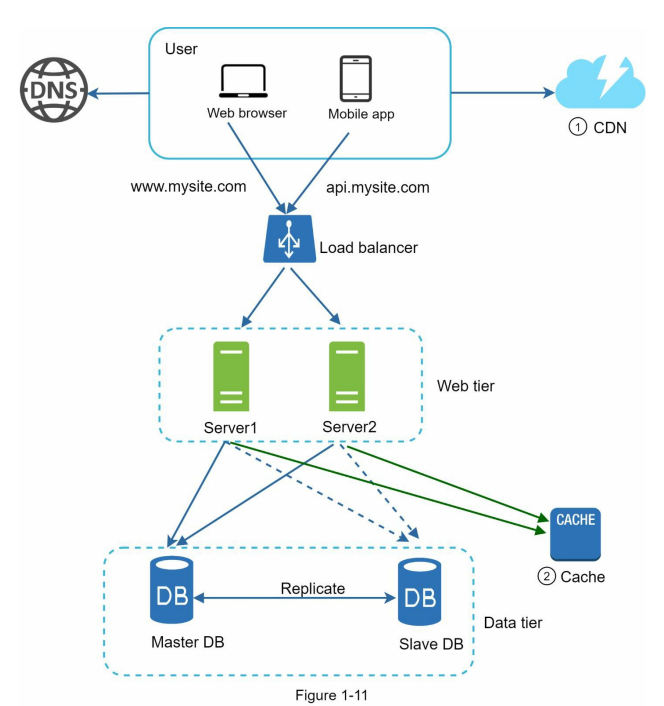
- As shown in Figure 1-4, users connect to the public IP of the load balancer directly. With this setup, web servers are unreachable directly by clients anymore. For better security, private IPs are used for communication between servers. A private IP is an IP address reachable only between servers in the same network; however, it is unreachable over the internet.
- The load balancer communicates with web servers through private IPs.
- In Figure 1-4, after a load balancer and a second web server are added, we successfully solved no failover issue and improved the availability of the web tier. Details are explained below:
• If server 1 goes offline, all the traffic will be routed to server 2. This prevents the website from going offline. We will also add a new healthy web server to the server pool to balance the load.
• If the website traffic grows rapidly, and two servers are not enough to handle the traffic, the load balancer can handle this problem gracefully. You only need to add more servers to the web server pool, and the load balancer automatically starts to send requests to them.
Database replication
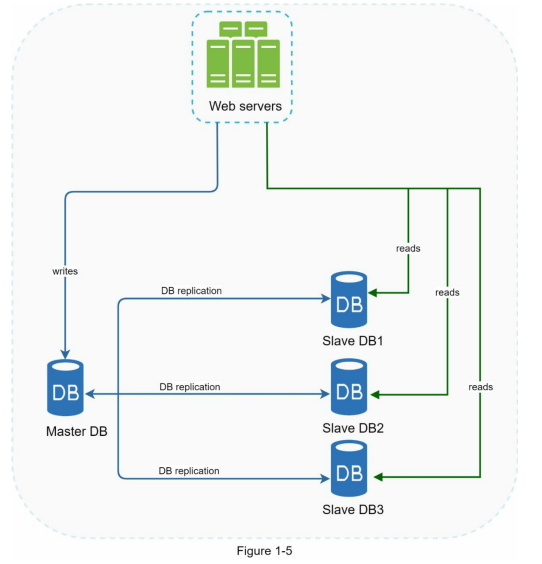
- Quoted from Wikipedia: “Database replication can be used in many database management systems, usually with a master/slave relationship between the original (master) and the copies(slaves)” [3].
- A master database generally only supports write operations. A slave database gets copies of the data from the master database and only supports read operations. All the data-modifying commands like insert, delete, or update must be sent to the master database.
- Most applications require a much higher ratio of reads to writes; thus, the number of slave databases in a system is usually larger than the number of master databases. Figure 1-5 shows a master database with multiple slave databases.
Advantages of database replication include:
- Better performance: In the master-slave model, write and update operations occur on the master node, while read operations are distributed across slave nodes. This parallel processing improves performance by allowing more queries to be executed simultaneously.
- Reliability: Database replication ensures data preservation even in the face of natural disasters or server failures. If one database server is destroyed, data remains intact because it is replicated across multiple locations. This mitigates the risk of data loss.
- High availability: By replicating data across different locations, a website or application can remain operational even if a database server goes offline. Accessing data from another available database server ensures continuous availability and uninterrupted service.
- To handle scenarios where databases go offline, the architecture depicted in Figure 1-5 employs the following strategies:
- If a slave database becomes unavailable, read operations are temporarily redirected to the master database. Once the issue is detected, a new slave database replaces the offline one. In the case of multiple slave databases, read operations are directed to the healthy ones, and a new database server is deployed if needed.
- If the master database goes offline, a slave database is promoted to become the new master. All database operations are temporarily executed on the new master, while a new slave database is immediately set up for data replication.
- Promoting a new master in production systems can be more complex, as the data in a slave database may not be up to date. Data recovery scripts are typically run to update the missing data. Other replication methods like multi-masters and circular replication exist but are beyond the scope of this book. For further information, readers can refer to the provided reference materials [4] [5].

- Let us take a look at the design:
• A user gets the IP address of the load balancer from DNS.
• A user connects the load balancer with this IP address.
• The HTTP request is routed to either Server 1 or Server 2.
• A web server reads user data from a slave database.
• A web server routes any data-modifying operations to the master database. This includes write, update, and delete operations.
- Now, you have a solid understanding of the web and data tiers, it is time to improve the load/response time. This can be done by adding a cache layer and shifting static content(JavaScript/CSS/image/video files) to the content delivery network (CDN).
Cache
- A cache is a temporary storage area that holds the results of expensive or frequently accessed data in memory. Its purpose is to enhance performance by reducing the need for repeated database calls. When a new web page loads, it typically requires one or more database queries to retrieve data. However, this can negatively impact application performance.
- By implementing a cache, the data fetched from the database can be stored in memory temporarily. Subsequent requests for the same data can then be served directly from the cache, avoiding the need for additional database calls. This significantly improves application performance by reducing the time and resources required for data retrieval. In Figure 1-6, the cache is depicted as an intermediary between the web application and the database, intercepting requests and providing faster responses.
- Using a cache helps mitigate the performance issues caused by repetitive database calls, resulting in a more efficient and responsive application.
Cache Tier
- The cache tier refers to a layer of temporary data storage that is significantly faster than the database.
- It offers several advantages, including improved system performance, reduced database workloads, and the ability to independently scale the cache tier. In Figure 1-7, a potential configuration of a cache server setup is illustrated.

- When a web server receives a request, it first checks if the cache holds the desired response. If the response is available in the cache, it is sent back to the client. If not, the server queries the database, stores the response in the cache, and then sends it to the client. This caching strategy is known as a read-through cache. Different caching strategies exist based on data type, size, and access patterns, as explained in a previous study [6].
- Interacting with cache servers is straightforward as most provide APIs for popular programming languages. Here is an example of typical Memcached APIs:
- When using a cache system, several considerations should be taken into account:
- Determine when to use cache: Cache is suitable for frequently accessed but infrequently modified data. It’s important to note that cached data is stored in volatile memory, so a cache server is not ideal for persisting critical data. Important data should be saved in persistent data stores.
- Implement an expiration policy: It is recommended to set an expiration policy for cached data. When data expires, it is removed from the cache. Setting a reasonable expiration date is crucial. A too short expiration date leads to frequent reloads from the database, while a too long expiration date can result in stale data.
- Ensure consistency: Maintaining consistency between the data store and the cache is important. Inconsistencies can occur when data-modifying operations on the data store and cache are not in a single transaction. When scaling across multiple regions, it becomes even more crucial to synchronize data updates.
- By considering these factors, you can effectively utilize a cache system to optimize performance and improve overall system efficiency.
Content delivery network (CDN)
- CDN (Content Delivery Network) is a network of distributed servers designed for delivering static content, such as images, videos, CSS, and JavaScript files. The primary purpose of CDN is to cache and serve static content efficiently.
- While dynamic content caching is not covered in this book, it is worth mentioning. Dynamic content caching allows caching of HTML pages based on factors like request path, query strings, cookies, and request headers. You can refer to the provided article [9] for further information on this topic. However, this book focuses specifically on utilizing CDN for caching static content.
- At a high level, when a user visits a website, the CDN serves static content from the server nearest to the user’s location. The closer the CDN server is to the user, the faster the website loads. For example, users in Los Angeles would experience faster content delivery from CDN servers located in San Francisco compared to users in Europe. Figure 1-9 illustrates how CDN significantly improves load times.
- CDN optimizes content delivery by minimizing the distance and network latency between users and the servers hosting static content. This enhances the overall performance and user experience of websites or applications utilizing CDN services.
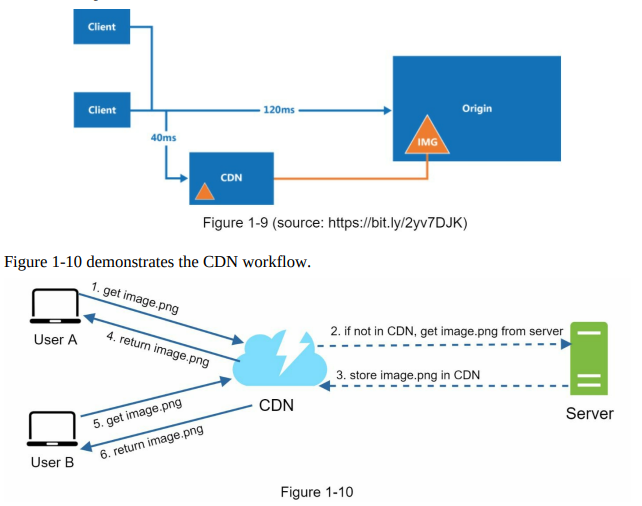
- When User A tries to access an image (e.g., image.png) through a CDN, the CDN provider supplies a domain-based URL for the image, such as “https://mysite.cloudfront.net/logo.jpg” or “https://mysite.akamai.com/image-manager/img/logo.jpg”.
- If the requested image is not present in the CDN’s cache, the CDN server requests the file from the origin, which can be a web server or online storage like Amazon S3.
- The origin server responds to the CDN server with the image, along with an optional HTTP header called Time-to-Live (TTL), which specifies how long the image should be cached.
- The CDN server caches the image and serves it to User A. The image remains cached in the CDN until the TTL expires.
- Later, User B sends a request to access the same image.
- As long as the TTL has not expired, the image is retrieved directly from the cache, and there is no need to fetch it again from the origin server.
- Considerations for using a CDN:
- Cost: CDNs are provided by third-party vendors and involve charges for data transfers. It is advisable to remove infrequently accessed assets from the CDN to avoid unnecessary costs.
- Setting cache expiry: For time-sensitive content, setting an appropriate cache expiry time is crucial. It should be neither too long, which can result in stale content, nor too short, causing frequent reloads from the origin server.
- CDN fallback: Consider how your website or application handles CDN failures. Clients should be able to detect such issues and request resources directly from the origin server during temporary CDN outages.
- Invalidating files: To remove a file from the CDN before its expiry, you can use CDN vendor APIs to invalidate the object or utilize object versioning by appending a version number or parameter to the URL (e.g., image.png?v=2).
- By considering these factors, you can effectively utilize a CDN while optimizing costs, managing cache expiration, handling CDN failures, and controlling file invalidation.
Message queue
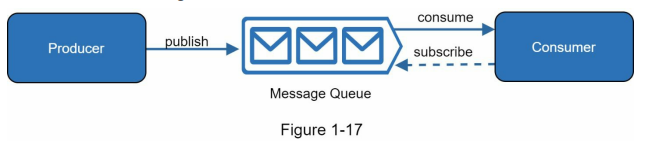
- A message queue is a durable component that enables asynchronous communication by serving as a buffer for distributing requests. Producers create messages and publish them to the queue, while consumers connect to the queue to process the actions defined by the messages. This decoupled architecture, as depicted in Figure 1-17, offers scalability and reliability benefits.
- The message queue allows producers to post messages even when consumers are unavailable, ensuring that messages are not lost. Consumers can retrieve messages from the queue, even if the producers are not currently active. This decoupling makes message queues ideal for building scalable and reliable applications.
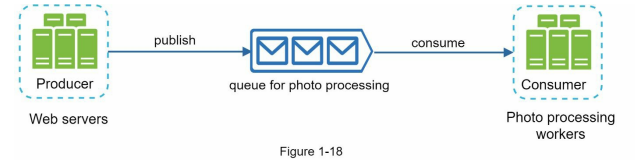
- Consider a use case where an application supports photo customization tasks that require time to complete, such as cropping, sharpening, and blurring. In this scenario, web servers publish photo processing jobs to the message queue, and photo processing workers asynchronously pick up these jobs from the queue. The number of producers and consumers can be scaled independently. If the queue size increases, additional workers can be added to reduce processing time. Conversely, if the queue is frequently empty, the number of workers can be reduced.
- By utilizing message queues, applications can handle asynchronous communication effectively, optimize resource allocation, and achieve scalability based on workload demands.
Logging, metric, automation
- As a small website grows into a large business, investing in logging, metrics, and automation becomes essential for effective management.
- Logging: Monitoring error logs is crucial for identifying system errors and issues. Error logs can be monitored at the server level or aggregated into a centralized service for easy search and viewing.
- Metrics: Collecting various metrics provides insights into the business and helps assess the system’s health. Metrics can include host-level information such as CPU usage, memory usage, and disk I/O, as well as aggregated metrics for different tiers like the database or cache. Key business metrics like daily active users, retention rates, and revenue are also important.
- Automation: As systems grow in size and complexity, automation tools become vital for improved productivity. Continuous integration ensures that each code check-in is verified through automated processes, enabling early detection of problems. Automating processes such as build, testing, and deployment can significantly enhance developer productivity.
- By implementing logging, metrics, and automation practices, businesses can effectively monitor and troubleshoot their systems, gain valuable insights, and improve productivity across development and operations teams.
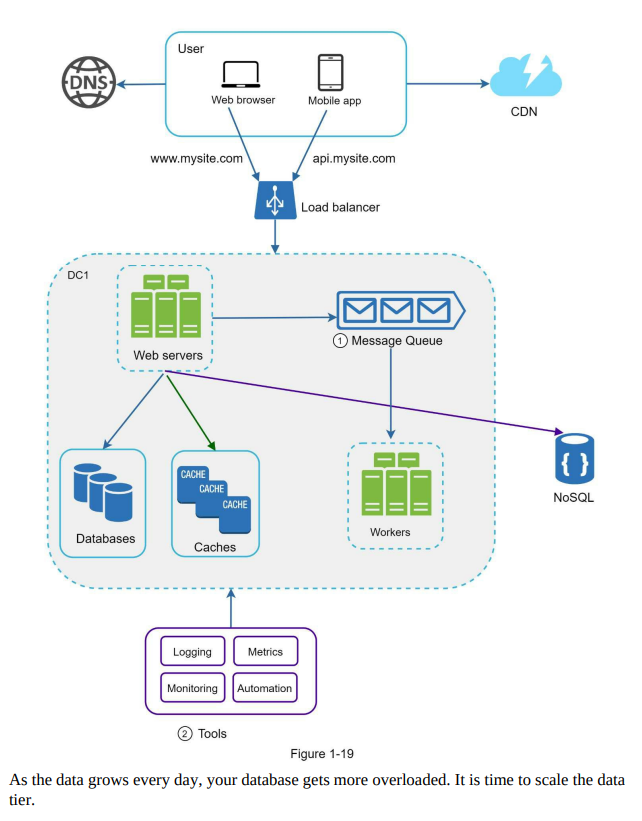
Database scaling
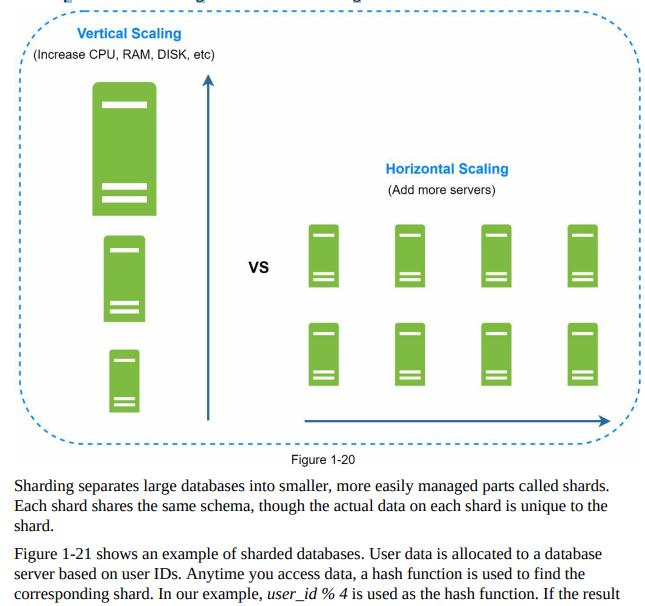
- Database scaling can be achieved through two approaches: vertical scaling and horizontal scaling.
- Vertical scaling, or scaling up, involves adding more power (CPU, RAM, disk, etc.) to an existing machine. This approach allows for increased data storage and handling capacity. Powerful database servers can handle large amounts of data and user traffic. However, vertical scaling has some drawbacks, including hardware limitations, a higher risk of single point of failures, and increased cost due to expensive hardware.
- Horizontal scaling, or sharding, involves adding more servers to distribute the database workload. This approach allows for better scalability as the workload is divided among multiple servers. Horizontal scaling offers advantages such as increased capacity, improved performance, and better fault tolerance. Figure 1-20 provides a comparison between vertical and horizontal scaling.
- By understanding the differences between vertical and horizontal scaling, businesses can choose the appropriate approach based on their specific needs and requirements to effectively scale their databases.
Sharding
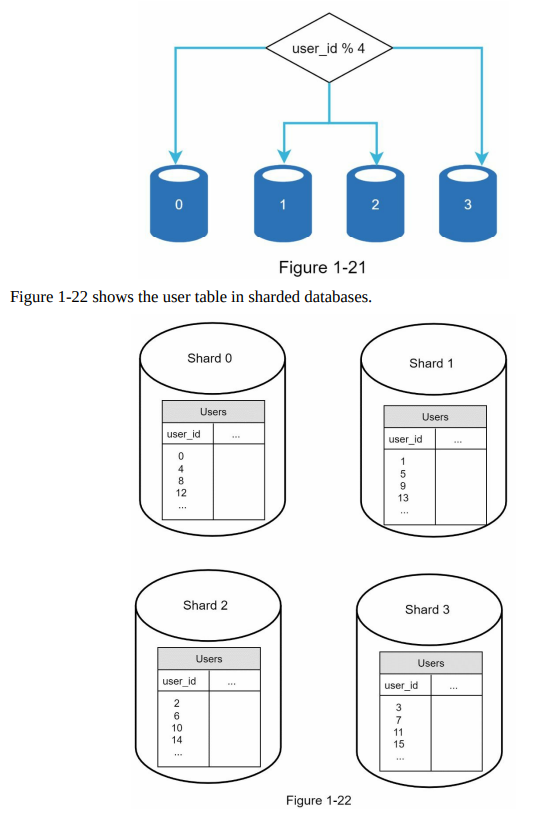
- The choice of the sharding key is crucial when implementing a sharding strategy. The sharding key determines how data is distributed among different shards. It is important to select a sharding key that evenly distributes the data to ensure efficient retrieval and modification of data. In Figure 1-22, “user_id” is shown as an example of a sharding key.
- Sharding is a valuable technique for scaling databases, but it introduces complexities and challenges to the system. One challenge is the need for resharding data. This occurs when a single shard reaches its data capacity or when data distribution becomes uneven among shards. Resharding involves updating the sharding function and moving data between shards. Consistent hashing is a commonly used technique to address this challenge, and it will be discussed further in Chapter 5.
- Overall, choosing an appropriate sharding key and effectively managing the resharding process are important considerations when implementing sharding as a scaling solution for databases.
Celebrity problem
- The celebrity problem, also known as the hotspot key problem, arises when a specific shard in a sharded database becomes overloaded due to excessive access. This can occur when popular entities, such as celebrities, are concentrated on a single shard, leading to an overwhelming number of read operations. One solution is to allocate a separate shard for each celebrity, potentially requiring further partitioning within each shard.
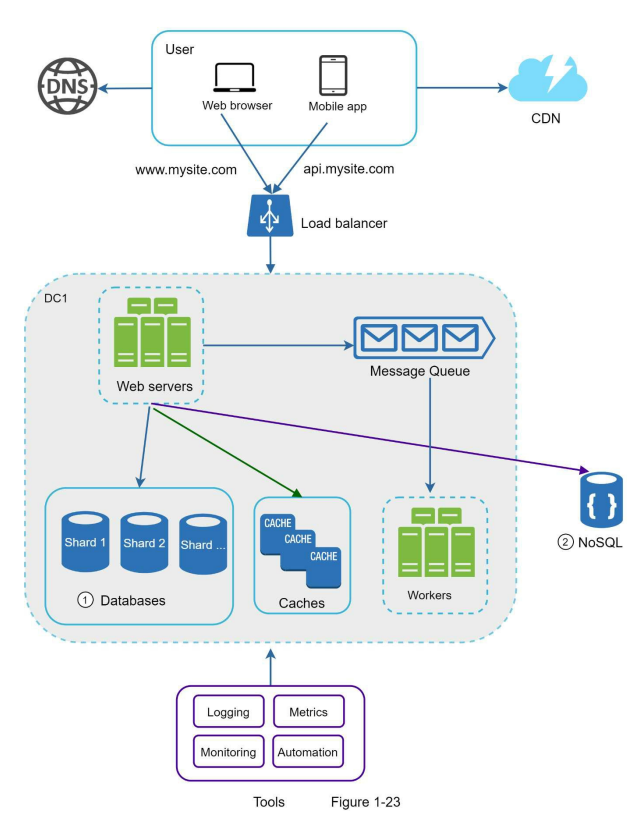
- Join operations and normalization become challenging in a sharded database. Performing joins across multiple shards is difficult, so a common workaround is to denormalize the database by consolidating related data into a single table. This allows queries to be executed within a single shard.
- In Figure 1-23, the database is sharded to handle high data traffic, and non-relational functionalities are offloaded to a NoSQL data store to alleviate the database’s workload. NoSQL databases offer flexibility and scalability for various use cases, and you can find more information about them in the referenced article.
Framework for System Design
- The process for an effective system design interview can be summarized in four steps.
- Some example questions to ask include understanding the specific features to be built, the anticipated user scale and growth, the technology stack, and any existing services that can be leveraged to simplify the design.
- For instance, if designing a news feed system, asking questions about whether it’s a mobile or web app, the important features, the order of the news feed, the number of friends a user can have, and the traffic volume can help clarify the requirements.
- Understanding the requirements and clarifying any ambiguities is key to laying the foundation for a successful system design interview.
Step 2 - Propose high-level design and get buy-in
- In this step of the system design interview, the focus is on developing a high-level design and collaborating with the interviewer.
- Some key points to consider during this step are:
- Come up with an initial blueprint for the design and seek feedback from the interviewer. Treat the interviewer as a teammate and work together to refine the design.
- Use box diagrams to visually represent the key components of the system, such as clients (mobile/web), APIs, servers, data stores, cache, CDN, and message queue.
- Perform back-of-the-envelope calculations to evaluate if the design aligns with scale constraints. Communicate with the interviewer if such calculations are necessary before diving into them.
- Discuss concrete use cases to further refine and frame the high-level design. These use cases can help uncover potential edge cases that may not have been initially considered.
- The inclusion of API endpoints and database schema in the high-level design depends on the specific problem. For larger design problems, such as designing a search engine like Google, these details may be too low-level. However, for problems like designing the backend for a multiplayer poker game, including these details is appropriate.
- An example scenario, such as designing a news feed system, can be used to demonstrate the approach to the high-level design. The design can be divided into two flows: feed publishing and news feed building, with considerations for data storage, caching, and the order of post aggregation.
- Overall, effective communication and collaboration with the interviewer are essential in this step to create a solid high-level design.
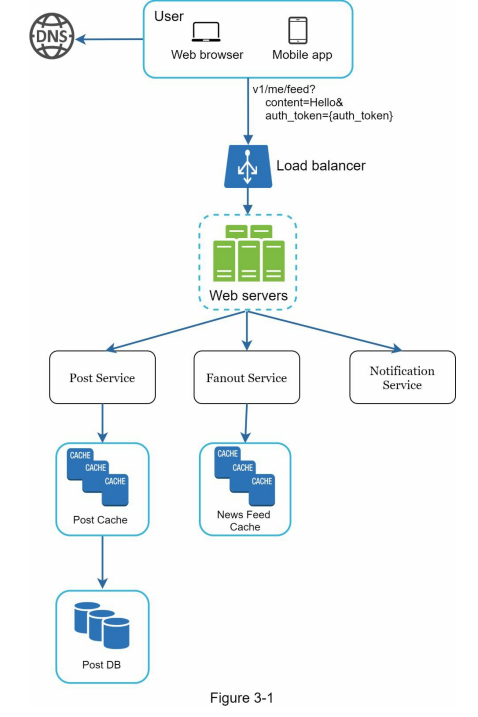
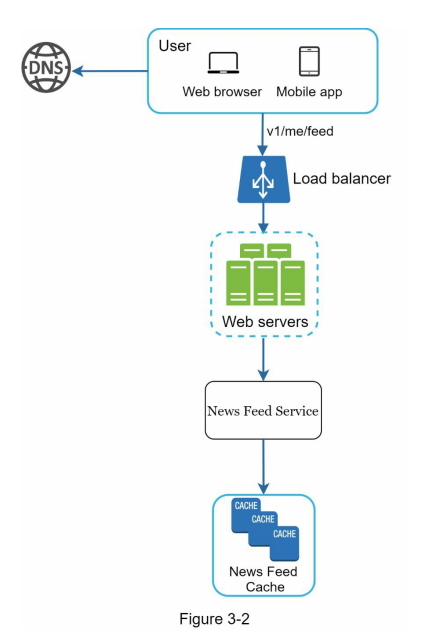
- Below, Figure 3-1 and Figure 3-2 present high-level designs for feed publishing and news feed building flows, respectively.
Step 3- Design deep dive
- At this step, you and your interviewer should have already achieved the following objectives:
• Agreed on the overall goals and feature scope
• Sketched out a high-level blueprint for the overall design
• Obtained feedback from your interviewer on the high-level design
• Had some initial ideas about areas to focus on in deep dive based on her feedback
- During the system design interview, it is important to collaborate with the interviewer to identify and prioritize components in the architecture.
- It is crucial to adapt to the specific interview context, as the focus may vary. The interviewer may indicate a preference for high-level design or may want to discuss system performance characteristics and resource estimations. Depending on the system being designed, certain components may require more detailed exploration, such as the hash function design for a URL shortener or addressing latency and online/offline status in a chat system.
- Time management is essential to ensure that the interview progresses effectively. It’s important to avoid getting too caught up in unnecessary details that don’t showcase your abilities. For instance, delving into intricate algorithms like Facebook’s EdgeRank during a system design interview may not be ideal as it can consume valuable time without demonstrating your skills in scalable system design.
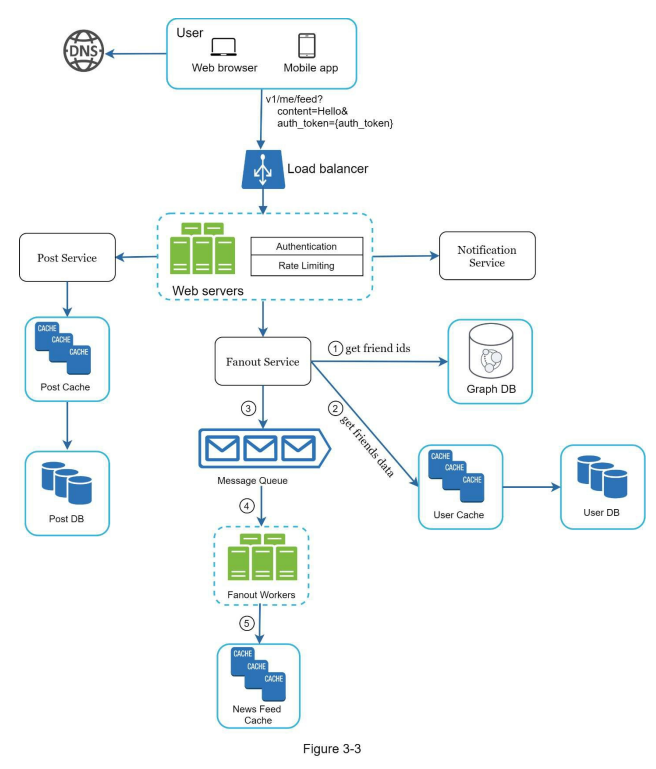
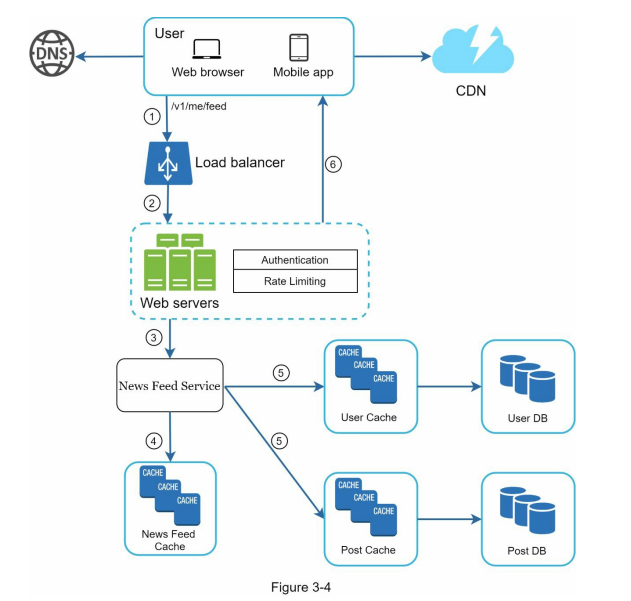
- In an example scenario, after discussing the high-level design for a news feed system, the focus shifts to two important use cases: feed publishing and news feed retrieval. Detailed designs for these use cases are presented in figures, which will be further explained in subsequent chapters.
- Overall, maintaining a balance between addressing important components and managing time effectively is crucial in a system design interview.
Step 4 Wrap Up
- In the final step of the system design interview, there are a few key directions to follow. The interviewer may ask follow-up questions or allow you to discuss additional points. Here are some suggestions for this step:
- Identify system bottlenecks and discuss potential improvements. Show your critical thinking and demonstrate that there is always room for improvement, even if you believe your design is strong. This showcases your ability to analyze and optimize systems.
- Recap your design to refresh the interviewer’s memory, especially if you suggested multiple solutions or discussed various components during the interview.
- Discuss error cases and how you would handle them, such as server failures or network losses.
- Mention operational aspects like monitoring metrics and error logs, as well as how you would roll out the system.
- Address future scalability by discussing how the design would accommodate a larger user base. For example, if the current design supports 1 million users, explain the necessary changes to support 10 million users.
- Propose refinements or additional improvements you would make if given more time.
- To conclude, here is a list of dos and don’ts to keep in mind during the interview:
Dos:
- Always seek clarification and avoid assuming assumptions.
- Understand the problem requirements thoroughly.
- Remember that there is no one right or best answer. Solutions differ based on the specific context and requirements.
- Communicate your thoughts and engage with the interviewer throughout the process.
- Suggest multiple approaches if possible.
- Start with the high-level design and then delve into the details of each component.
- Collaborate with the interviewer as a teammate, bouncing ideas off each other.
- Persevere and don’t give up easily.
Don’ts:
- Don’t come unprepared for typical interview questions.
- Avoid jumping into a solution without clarifying requirements and assumptions.
- Don’t focus excessively on a single component initially; provide the high-level design first and then delve into specifics.
- If you’re stuck, don’t hesitate to ask for hints.
- Maintain active communication and avoid thinking in silence.
- Don’t consider the interview finished until you receive feedback from the interviewer. Seek feedback early and often.
Time allocation for each step
- System design interview questions are usually very broad, and 45 minutes or an hour is not enough to cover the entire design.
- Time management is essential. How much time should you spend on each step? The following is a very rough guide on distributing your time in a 45- minute interview session.
- Please remember this is a rough estimate, and the actual time distribution depends on the scope of the problem and the requirements from the interviewer.
- Step 1 Understand the problem and establish design scope: 3 - 10 minutes
- Step 2 Propose high-level design and get buy-in: 10 - 15 minutes
- Step 3 Design deep dive: 10 - 25 minutes
- Step 4 Wrap: 3 - 5 minutes